

Where Is Build Break Repair Filmed
This browser is no longer supported.
Upgrade to Microsoft Edge to take advantage of the latest features, security updates, and technical support.
Make lawmaking piece of work in Visual Studio
Visual Studio provides a powerful integrated set of project build and debugging tools. In this article, find out how Visual Studio tin assist you detect problems in your code using build output, code analysis, debugging tools, and unit tests.
You lot've figured out the editor and created some code. At present, y'all desire to brand sure the lawmaking works properly. In Visual Studio, as with virtually IDEs, there are two phases to making code work: edifice the code to grab and resolve projection and compiler errors, and running the code to find run-fourth dimension and dynamic errors.
Build your code
At that place are 2 basic types of build configuration: Debug and Release. The Debug configuration produces a slower, larger executable that allows for a richer interactive run-time debugging feel. The Debug executable should never be shipped. The Release configuration builds a faster, optimized executable that's appropriate to ship (at least from the perspective of the compiler). The default build configuration is Debug.
The easiest way to build your project is to printing F7, but yous can besides showtime the build past selecting Build > Build Solution from the chief menu.

Yous can find the build procedure in the Output window at the lesser of the Visual Studio UI. Errors, warnings, and build operations are displayed here. If you have errors (or if you accept warnings above a configured level), your build fails. Y'all can click on the errors and warnings to go to the line where they occurred. Rebuild your project by either pressing F7 again (to recompile only the files with errors) or Ctrl+Alt+F7 (for a clean and complete rebuild).
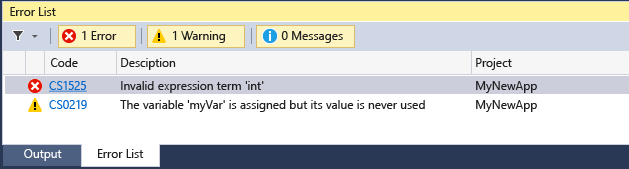
At that place are two tabbed windows in the results window below the editor: the Output window, which contains the raw compiler output (including error messages); and the Mistake List window, which provides a sortable and filterable listing of all errors and warnings.
When build succeeds, you see results like this in the Output window:

Review the Mistake List
Unless you've made no modifications to code you've previously and successfully compiled, you probably have an error. If y'all're new to coding, you probably have lots of them. Errors are sometimes obvious, such equally a uncomplicated syntax error or incorrect variable name, and sometimes they are difficult to understand, with only a cryptic lawmaking to guide you. For a cleaner view of the issues, navigate to the bottom of the build Output window, and click the Error Listing tab. This takes you to a more organized view of the errors and warnings for your project, and gives you some extra options as well.

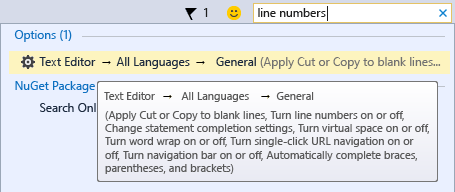
Click on the error line in the Fault List window to jump to the line the fault occurs in. (Or turn on line numbers by pressing Ctrl+Q, typing line numbers, and and so choosing Plough line numbers on or off from the results. This is the fastest way to go to the Options dialog where you can turn on line numbers.)

Press Ctrl+G to quickly jump to the line number where the error occurred.
The fault is identified by a red "squiggle" underscore. Hover over it for additional details. Make the set and it will go away, although you may introduce a new error with the correction. (This is called a "regression".)

Walk through the error listing and address all the errors in your code.
Review errors in detail
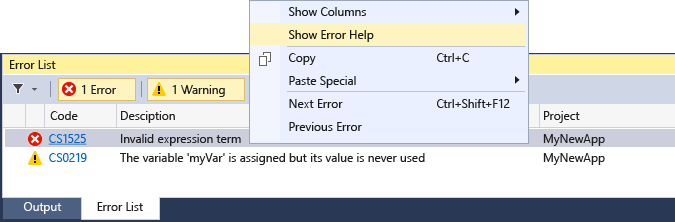
Many errors may make no sense to you, phrased as they are in the terms of the compiler. In those cases, you'll need additional information. From the Fault Listing window, you lot can do an automatic Bing search for more information on the error or alarm. Right-click on the corresponding entry line and select Evidence Mistake Help from the context carte du jour, or click on the hyperlinked error code value in the Code cavalcade of the Error List.
Depending on your settings, either your web browser displays the search results for the mistake code and text, or a tab opens inside Visual Studio and shows the results of the Bing search. The results are from many unlike sources on the Internet, and non all may be helpful.
Use code analysis
Code analyzers look for common code problems that tin can lead to run-time errors or bug in code direction.
C# and Visual Basic code analysis
Visual Studio includes a built-in set of .NET Compiler Platform analyzers that examine C# and Visual Bones lawmaking equally y'all type. You tin can install additional analyzers as a Visual Studio extension, or as a NuGet bundle. If rule violations are constitute, they are reported both in the Error Listing and in the lawmaking editor as a squiggle under the offending code.
C++ code analysis
To analyze C++ code, run static code analysis. Arrive the habit of running it once yous've cleaned up the obvious errors that prevent a successful build, and take some fourth dimension to accost the warnings it may produce. You'll save yourself some headaches downwardly the road, and you lot may acquire a few code style techniques.
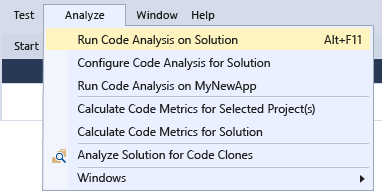
Printing Alt+F11 (or select Analyze > Run Code Analysis on Solution from the height menu) to start static lawmaking analysis.
Any new or updated warnings appear in the Error List tab at the lesser of the IDE. Click on the warnings to jump to them in code.

Utilise Quick Deportment to fix or refactor code
Quick Actions, bachelor from the light seedling or screwdriver icon, let you refactor code inline. They are an easy fashion to fix common warnings quickly and effectively in C#, C++, and Visual Basic code. To admission them, correct-click on a warning squiggle and select Quick Actions and refactorings. Or, when your cursor is on the line with the colored squiggle, printing Ctrl+. or select the low-cal seedling, error light bulb, or screwdriver icon in the margin. You'll see a list of possible fixes or refactorings you tin employ to that line of code.
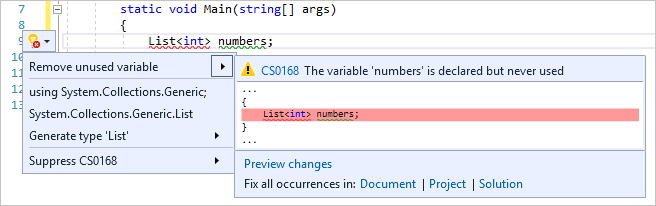
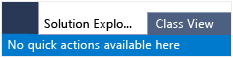
Quick Actions can be used wherever code analyzers determine in that location'due south an opportunity to gear up, refactor, or improve your code. Click on any line of code, right-click to open up the context menu, and select Quick Actions and refactorings. If refactoring or improvement options are available, they are displayed. Otherwise, the message No quick deportment available here displays in the lower-left corner of the IDE.
With feel, you can quickly use the arrow keys and Ctrl+. to check for easy refactoring opportunities and clean upwardly your lawmaking!
Run Code Cleanup
Visual Studio provides on-need formatting of your C# code file, including code fashion preferences, through the Code Cleanup push button at the bottom of the editor.

In addition to formatting your file for spaces, indents, et cetera, Code Cleanup too applies a set of code style conventions that you ascertain. Your preferences for each code mode are read from the EditorConfig file, if y'all have i for the projection, or from the code style settings in the Options dialog box.
Debug your running code
Now that you've successfully congenital your code and performed a little make clean upwardly, run it by pressing F5 or selecting Debug > Start Debugging. This starts your app in a debug surroundings and then you tin can notice its behavior in detail. The Visual Studio IDE changes while your app is running: the Output window is replaced by two new ones (in the default window configuration), the Autos/Locals/Spotter tabbed window and the Call Stack/Breakpoints/Exception Settings/Output tabbed window. These windows accept multiple tabs that allow you to inspect and evaluate your app's variables, threads, call stacks, and various other behaviors as it runs.

Stop your app by pressing Shift+F5 or past clicking the Terminate button. Or, you tin just close the app'southward main window (or command-line dialog).
If your code ran perfectly and exactly as expected, congratulations! Withal, if it stops responding, or crashed, or gave you some foreign results, you lot'll need to detect the source of those problems and fix the bugs.
Set up simple breakpoints
Breakpoints are the about basic and essential feature of reliable debugging. A breakpoint indicates where Visual Studio should suspend your running code and then you tin accept a await at the values of variables, or the behavior of memory, or whether or not a branch of code is getting run. You don't need to rebuild a project later on setting and removing breakpoints.
Set a breakpoint by clicking in the far margin of the line where you desire the break to occur, or press F9 to set a breakpoint on the electric current line of code. When you run your code, it will pause (or break) before the instructions for this line of code are executed.
Common uses for breakpoints include:
-
To narrow downwards the source of a crash or unresponsive plan, scatter breakpoints throughout and effectually the code of the method call you think is causing the failure. Equally y'all run code in the debugger, remove and then reset the breakpoints closer together until you find the offending line of code. See the next section to learn how to run code in the debugger.
-
When yous introduce new code, fix a breakpoint at the beginning of it, and run the code to brand certain it is behaving as expected.
-
If yous've implemented a complicated behavior, set up breakpoints for the algorithmic code so you tin inspect the values of the variables and data when the program breaks.
-
If yous're writing C or C++ code, use breakpoints to end the code and so you tin can inspect accost values (await for Zilch) and reference counts when debugging for retentiveness-related failures.
For more information about using breakpoints, read Using breakpoints.
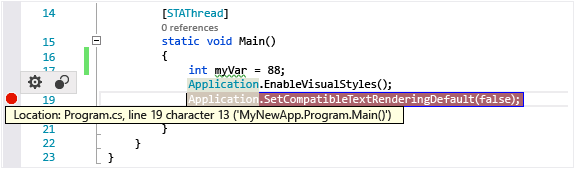
Inspect your code at run-time
When your running code hits a breakpoint and pauses, the line of code marked in yellow (the current argument) has not executed nonetheless. At this bespeak, you lot may desire to execute the electric current statement and and so inspect the inverse values. Yous can use several footstep commands to execute code in the debugger. If the marked lawmaking is a method call, y'all can stride into it by pressing F11. You can also step over the line of code by pressing F10. For boosted commands and details on how to step through lawmaking, read Navigate code with the debugger.

In the preceding illustration, you tin can advance the debugger one argument by pressing either F10 or F11 (since at that place is no method phone call hither, both commands have the same result).
While the debugger is paused, yous tin inspect your variables and call stacks to make up one's mind what is going on. Are the values in the ranges you expect to see? Are calls being made in the right order?
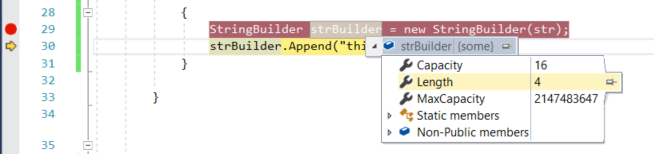
Hover over a variable to run into its current value and references. If you come across a value you didn't expect, you lot probably have a bug in the preceding or calling lawmaking. For more in-depth debugging information, learn more about using the debugger.
Additionally, Visual Studio displays the Diagnostic Tools window, where you can discover your app'southward CPU and memory usage over time. Later in your app evolution, y'all can utilise these tools to look for unanticipated heavy CPU usage or memory allocation. Use information technology in conjunction with the Spotter window and breakpoints to make up one's mind what's causing unexpected heavy usage or unreleased resources. For more than data, come across Profiling characteristic tour.
Run unit of measurement tests
Unit tests are your beginning line of defense against code bugs because, when done correctly, they test a single "unit" of code, typically a unmarried part, and are easier to debug than your full program. Visual Studio installs the Microsoft unit testing frameworks for both managed and native lawmaking. Utilize a unit of measurement testing framework to create unit tests, run them, and study the results of these tests. Rerun unit tests when you make changes, to test that your code is all the same working correctly. With Visual Studio Enterprise edition, yous can run tests automatically after every build.
To get started, read Generate unit of measurement tests for your code with IntelliTest.
To learn more about unit tests in Visual Studio and how they can aid you create better quality lawmaking, read Unit exam basics.
Meet besides
- First look at the debugger
- Learn more well-nigh using the debugger
- Generate and fix lawmaking
Feedback
Submit and view feedback for

Source: https://docs.microsoft.com/en-us/visualstudio/ide/find-and-fix-code-errors
Posted by: gistablity.blogspot.com
0 Response to "Where Is Build Break Repair Filmed"
Post a Comment